
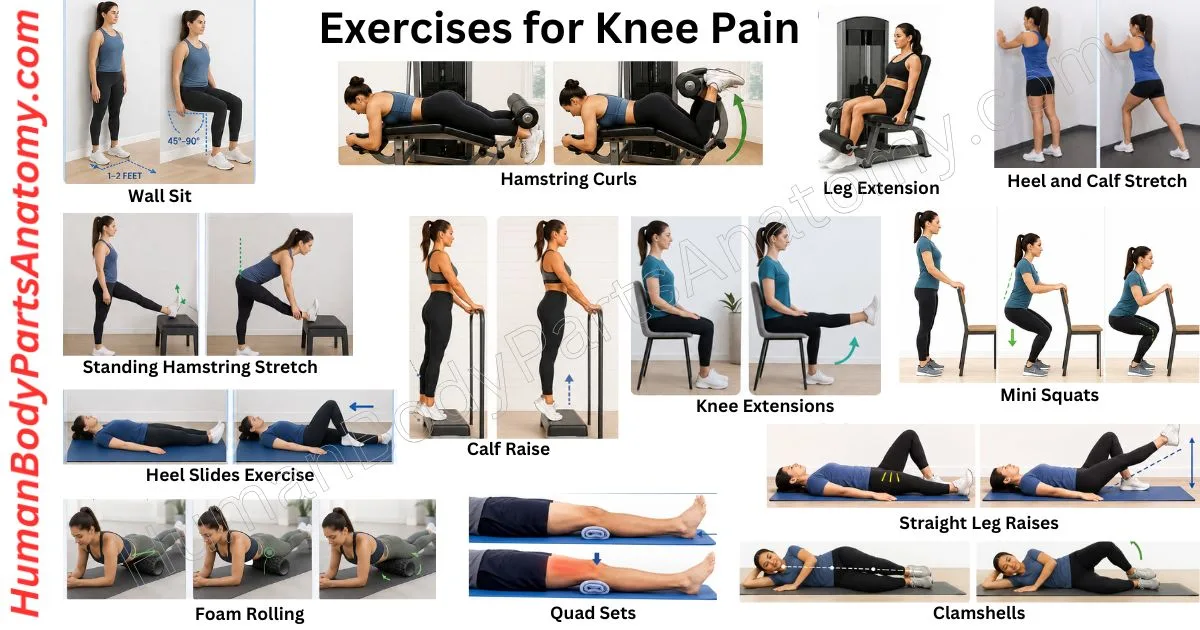
📅 Published on August 14, 2026 | 🕒 Last Reviewed & Updated on October 1, 2026
Overview of Exercises for Knee Pain
Knee pain is a common problem that affects people of all ages. It can develop due to injury, arthritis, muscle weakness, overuse, or everyday wear and tear. Knee pain may make it difficult to walk, climb stairs, exercise, or even complete simple daily activities.[2] The good news is that many cases of mild to moderate knee pain can improve with regular physiotherapy exercises.[3]
Physiotherapy exercises help strengthen the muscles that support the knee, improve flexibility, increase joint stability, and reduce pain over time.[3][4] They can also improve balance and range of motion, making everyday movements easier and helping lower the risk of future injuries. When performed correctly and consistently, these exercises can be an effective part of a long-term knee care routine.
One of the biggest advantages of physiotherapy exercises is that most of them can be done at home with little to no equipment. They are suitable for beginners, older adults, and anyone looking for a safe, low-impact way to support knee health.[5] However, if you have severe pain, significant swelling, a recent injury, or difficulty putting weight on your knee, it is important to consult a healthcare professional or physical therapist before starting any exercise program. Seek prompt medical assessment if you cannot bear weight on your knee, have severe pain even at rest, or if your knee buckles, locks, appears deformed, or will not fully bend or straighten.[1]
In this guide, you’ll discover 13 simple physiotherapy exercises for knee pain that are easy to perform at home. These exercises are designed to help relieve discomfort, strengthen the muscles around your knees, improve flexibility, and support healthy knee function so you can move with greater comfort and confidence.
Exercise for Knee Pain
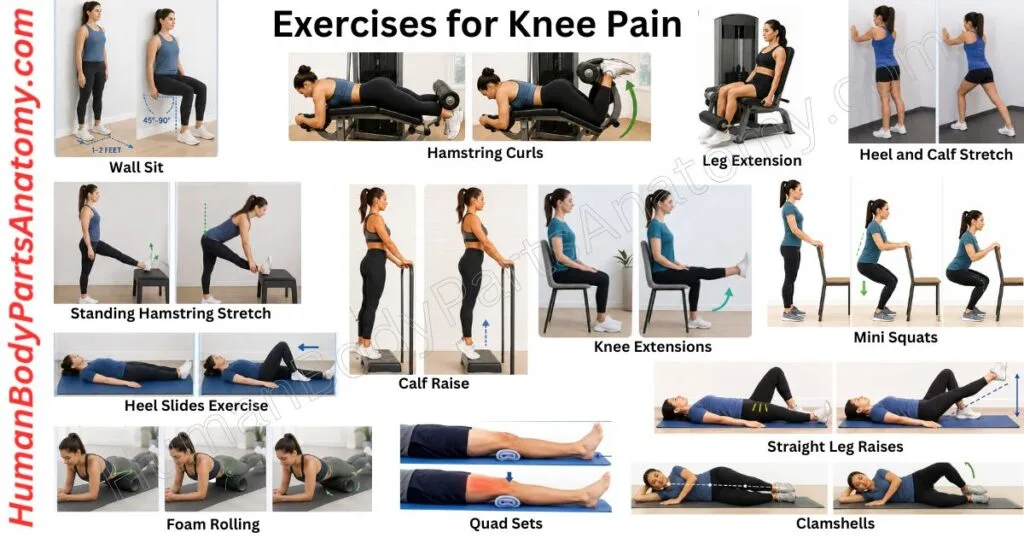
Knee Exercises for Pain
- Knee Extensions
- Heel and Calf Stretch
- Mini Squats
- Quad Sets
- Straight leg Raises
- Wall Sit
- Calf Raise
- Clamshells
- Standing Hamstring Stretch
- Heel Slides Exercise
- Foam Rolling
- Hamstring Curls
- Leg Extension
Exercises for Knee Pain
1. Knee Extensions
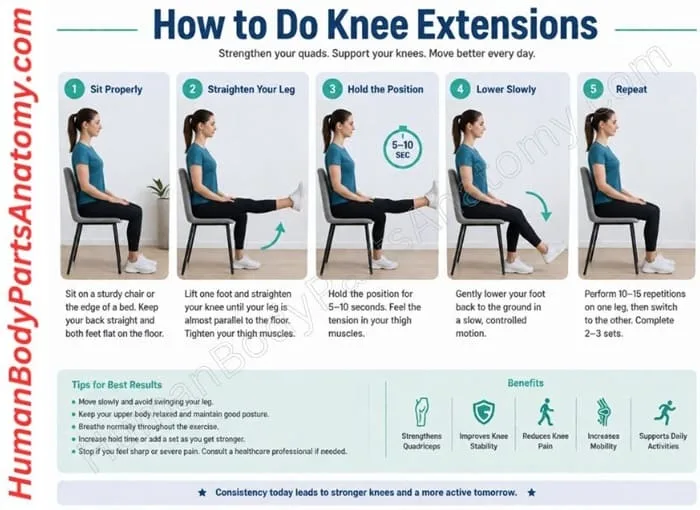
knee Extensions are a simple exercise that helps strengthen the quadriceps (front thigh muscles), which play an important role in supporting and stabilizing the knee joint. Strong quadriceps can reduce pressure on the knees, improve movement, and make everyday activities like walking, standing up, and climbing stairs easier.[6]
How to Do Knee Extensions (No Equipment Needed)
- Sit Properly: Sit on a sturdy chair or the edge of a bed with your back straight and both feet flat on the floor.
- Straighten Your leg: Slowly lift one foot and straighten your knee until your leg is almost parallel to the floor.
- Hold the Position: Tighten your thigh muscles and hold the position for 5–10 seconds.
- Lower Slowly: Bring your foot back down in a slow, controlled motion.
- Repeat: Perform 10–15 repetitions on one leg, then switch to the other. Complete 2–3 sets if comfortable.
Tips for Better Results
- Move slowly and avoid swinging your leg.
- Keep your upper body relaxed and maintain good posture.
- Breathe normally throughout the exercise.
- As your strength improves, gradually increase the hold time or add another set.
- Stop the exercise if you feel sharp or severe pain, and consult a healthcare professional if discomfort continues.
2. Heel and Calf Stretch
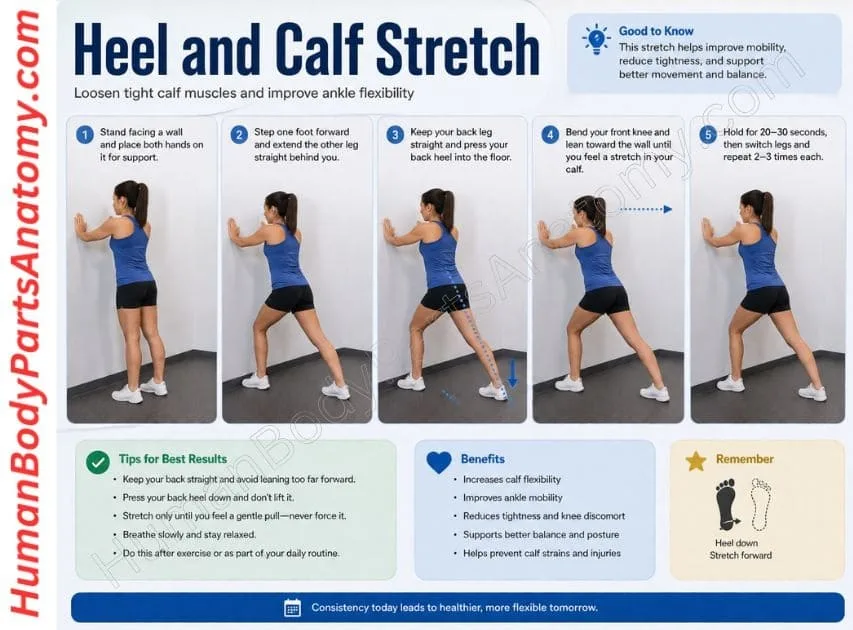
The heel and calf stretch helps loosen the calf muscles at the back of your lower leg. It can improve ankle flexibility, reduce muscle tightness, and support better walking, running, and overall leg movement.[7]
How to do the heel and calf stretch:
- Stand facing a wall with your feet about hip-width apart.
- Place both hands on the wall at about shoulder height for support.
- Step one foot backward as far as feels comfortable while keeping both toes pointing straight ahead.
- Keep both heels flat on the floor and slightly bend your front knee. Your back leg should stay straight.
- Slowly lean your body toward the wall until you feel a gentle stretch in the calf of your back leg.
- Hold the stretch for 20–30 seconds without bouncing, while breathing normally.[8]
- Return to the starting position, switch legs, and repeat.
Repetitions: Perform the stretch 2 times on each leg.
Tips for best results:
- Keep your back heel pressed firmly into the floor throughout the stretch.
- Avoid turning your feet outward, as this reduces the effectiveness of the stretch.
- Stretch gently until you feel mild tension, not pain.[8]
- This stretch is especially helpful before and after walking, running, hiking, or lower-body workouts to improve flexibility and reduce calf stiffness.[9]
3. Mini Squats
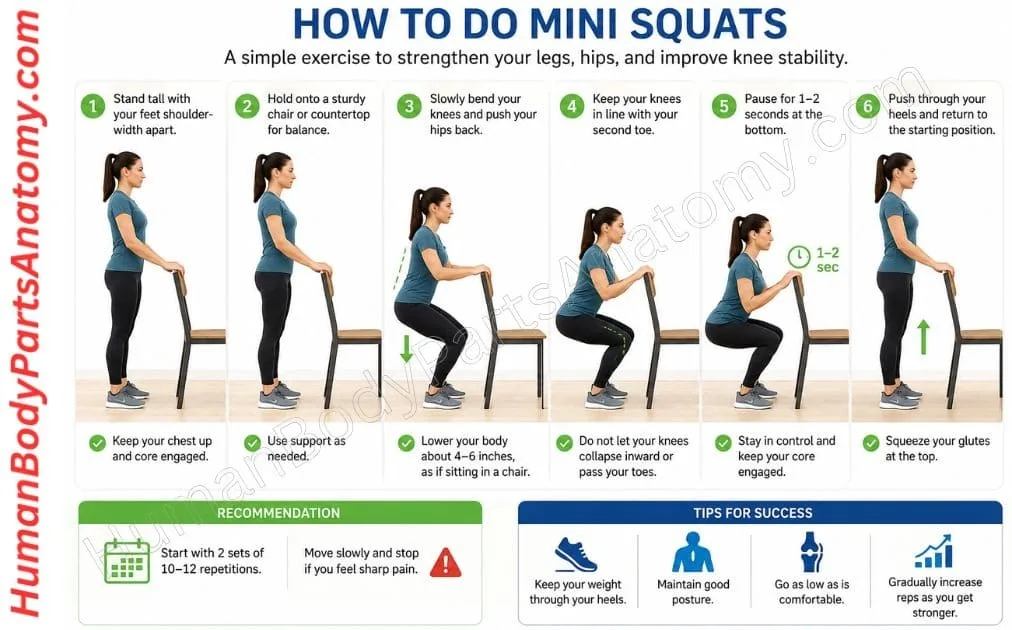
Once the earlier exercises feel easy and pain-free, you can add mini squats to your routine. This simple movement strengthens the quadriceps, hamstrings, glutes, and hips, helping improve knee stability during everyday activities like sitting, standing, and climbing stairs. Working the hips alongside the knee matters: for pain at the front of the knee, clinical practice guidelines give a strong (Grade A) recommendation to exercise programs that target both hip and knee muscles.[10]
How to Do Mini Squats
- Stand with your feet about shoulder-width apart. Hold onto a sturdy chair, countertop, or wall if you need extra support.
- Keep your chest lifted, back straight, and core muscles gently engaged.
- Slowly bend your knees and push your hips back as if you are about to sit in a chair. Lower only about 4 to 6 inches.
- Make sure your knees stay in line with your second toe and do not move inward or far past your toes.
- Pause for 1 to 2 seconds at the bottom of the movement.
- Push through your heels and slowly return to the starting position.
Start with 2 sets of 10–12 repetitions. Move in a slow, controlled manner and stop if you feel sharp pain. As your strength and balance improve, you can gradually increase the number of repetitions or hold the squat slightly longer. Performing mini squats regularly can improve lower-body strength and support healthy knee function.[3]
4. Quad Sets
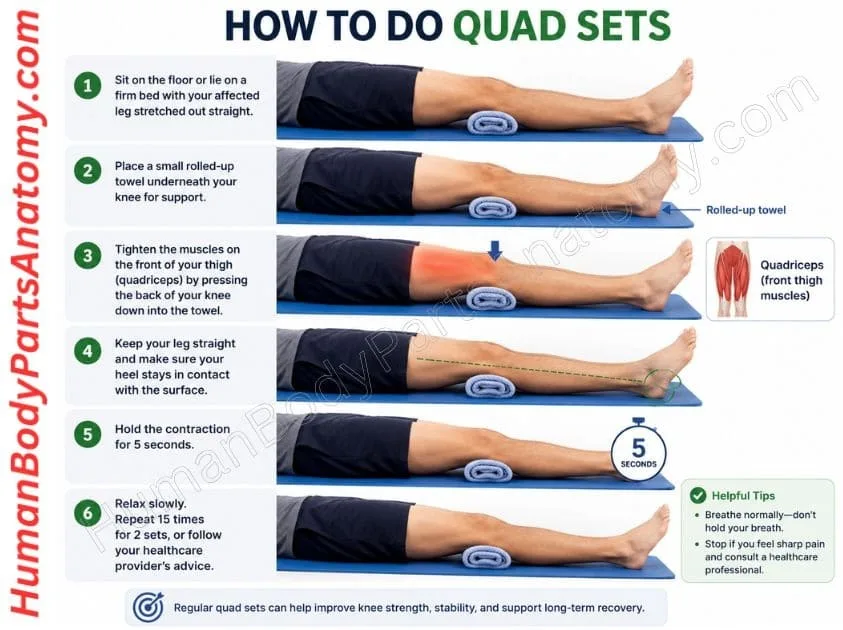
Quad sets are one of the best beginner exercises for strengthening the quadriceps, the large muscles at the front of your thigh that extend the knee and help maintain patellar stability.[6] Because this is an isometric exercise, your muscles work without moving the knee joint, making it a safe option if bending your knee is painful. This exercise is commonly included in rehabilitation programs for knee pain, injury recovery, and osteoarthritis.[11]
How to Do Quad Sets
- Sit on the floor or lie on a firm bed with your affected leg stretched out straight.
- Place a small rolled-up towel underneath your knee for support.
- Tighten the muscles on the front of your thigh by pressing the back of your knee firmly into the towel.
- Keep your leg straight and avoid lifting your heel off the surface.
- Hold the muscle contraction for 5 seconds, then slowly relax.
- Repeat 15 times and complete 2 sets, or follow your healthcare provider’s recommendations.
Helpful Tip: Breathe normally throughout the exercise and avoid holding your breath. If you feel sharp pain, stop the exercise and consult a healthcare professional or physical therapist before continuing. Performing quad sets consistently can help improve knee strength, increase joint stability, and support long-term recovery from knee pain.[3]
5. Straight Leg Raises
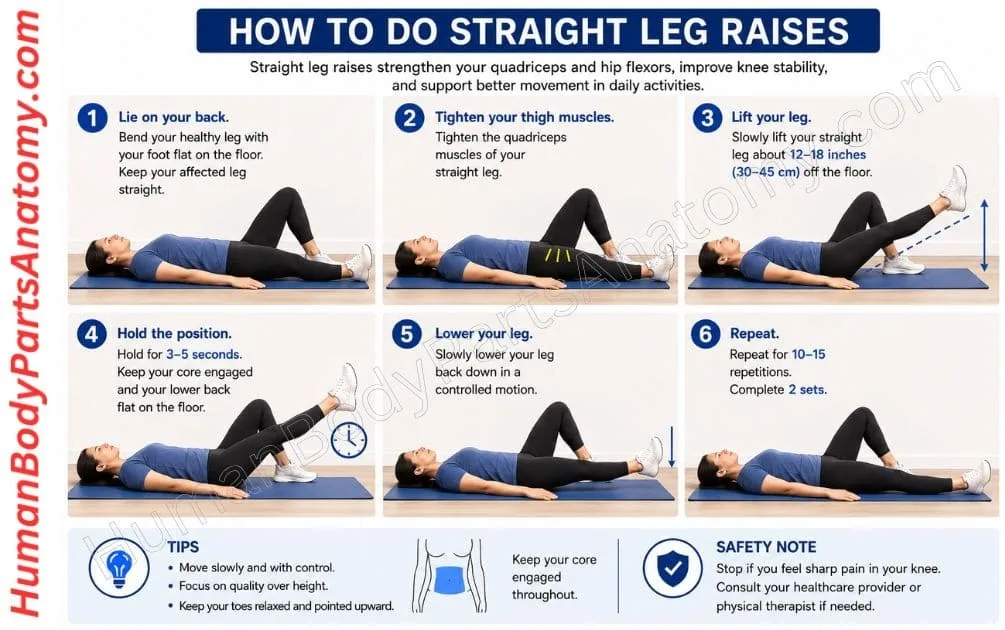
Straight leg raises are one of the best exercises for strengthening the quadriceps without putting too much stress on the knee joint.[11] They also work the hip flexors and core muscles, helping improve knee stability, balance, and leg control — the rectus femoris, one of the four quadriceps muscles, flexes the hip as well as helping extend the knee.[6] Regular practice can support proper knee alignment, reduce strain during walking or climbing stairs, and make everyday movements easier for people recovering from knee pain or injury.[12]
How to Do Straight Leg Raises
- Lie flat on your back on a comfortable surface.
- Bend your healthy leg so your foot rests flat on the floor, while keeping your affected leg straight.
- Tighten the thigh muscles (quadriceps) of the straight leg.
- Slowly lift the straight leg about 12–18 inches (30–45 cm) off the floor without bending the knee.
- Hold the position for 3–5 seconds, keeping your core engaged and your lower back flat against the floor.
- Slowly lower your leg back to the starting position in a controlled motion.
- Repeat for 10–15 repetitions, then complete 2 sets.
Tip: Focus on slow, controlled movements rather than lifting your leg as high as possible. If you feel sharp knee pain, stop the exercise and consult your healthcare provider or physical therapist. As your strength improves, you can gradually increase the number of repetitions or add light ankle weights under professional guidance.
6. Wall Sit
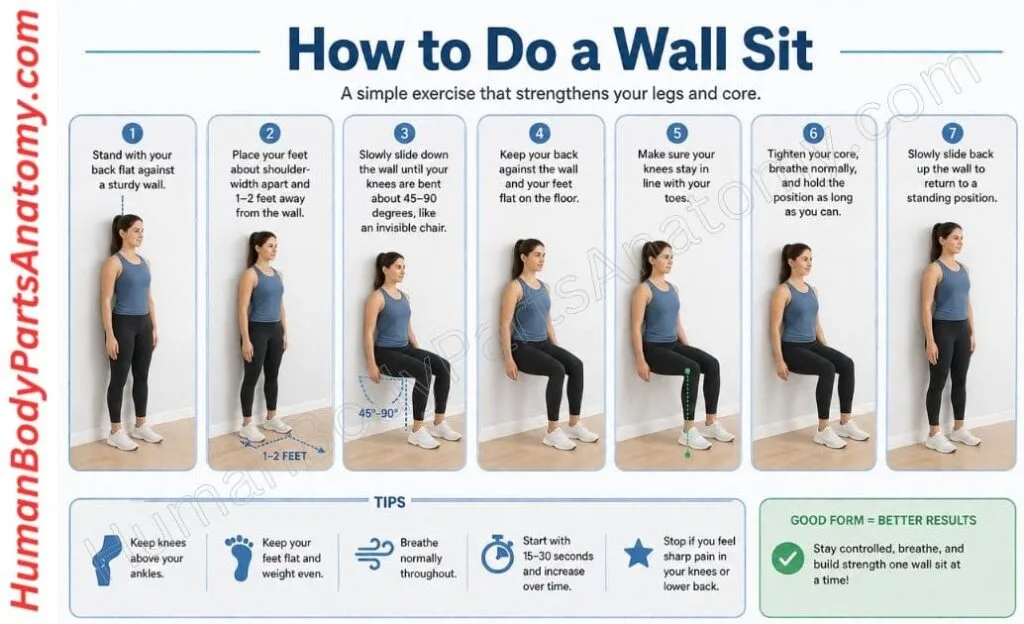
A wall sit is a simple exercise that uses your own body weight to strengthen your quadriceps (front thigh muscles).[6] It also works your glutes (buttocks), hamstrings, calves, and core muscles. During a wall sit, you hold one position without moving, making it an isometric exercise. Doing wall sits regularly can help build stronger legs, improve muscle endurance, support healthy knees, and make everyday activities like walking, climbing stairs, sitting, and standing easier.[3]
How to Do a Wall Sit
- Stand with your back flat against a sturdy wall.
- Place your feet about shoulder-width apart and 1–2 feet away from the wall.
- Slowly slide down the wall until your knees are bent about 45–90 degrees, like you are sitting in an invisible chair.
- Keep your back against the wall and your feet flat on the floor.
- Make sure your knees stay in line with your toes.
- Tighten your core, breathe normally, and hold the position as long as you can with good form.
- Slowly slide back up the wall to return to a standing position.
Tips
- Keep your knees above your ankles and avoid pushing them past your toes.
- Keep your weight evenly on both feet.
- Do not hold your breath. Breathe slowly and steadily.
- Start by holding the position for 15–30 seconds. As your legs get stronger, increase the time.
- If the exercise feels too hard, don’t squat as low. You can gradually lower yourself more as you improve.
7. Calf Raise
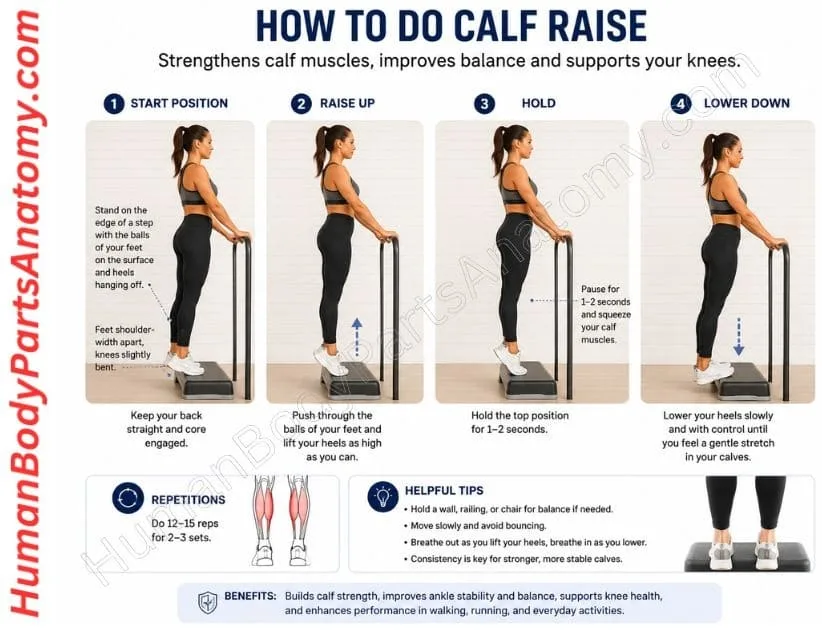
Calf raises are an easy exercise that builds strength in your calf muscles. Strong calves help improve balance and support your ankles during everyday activities. The gastrocnemius, the most superficial calf muscle, arises from the femur and crosses the knee as well as the ankle, so it assists knee flexion in addition to pushing the body forward during walking.[7]
How to perform a calf raise:
- Stand on the edge of a step with the front of your feet on the surface and your heels hanging off the edge. Keep your feet about shoulder-width apart and your knees slightly bent.
- Press through the balls of your feet and slowly lift your heels as high as you comfortably can.
- Pause for a moment at the top while tightening your calf muscles.
- Slowly lower your heels below the step until you feel a light stretch in your calves.
- Complete 12–15 repetitions and aim for 2–3 sets, depending on your fitness level.
Helpful Tip: If you feel unsteady, lightly hold a wall or railing for support. Perform each movement slowly and with control to strengthen your muscles safely and effectively.
8. Clamshells
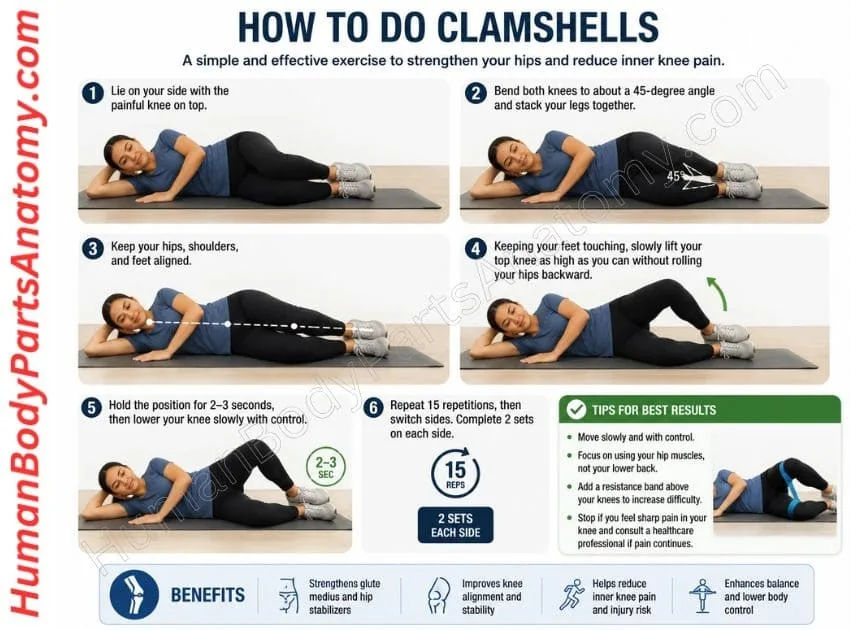
Clamshells strengthen the muscles around your hips, especially the gluteus medius. Hip strength is often lower in people with pain at the front of the knee,[13] and strengthening the hip alongside the knee is a core part of recommended treatment: clinical practice guidelines advise prioritising the muscles at the outside and back of the hip in the early stages of care, then adding knee-focused exercises as treatment progresses.[10]
Steps to Perform Clamshells :
- Lie on one side with the affected knee facing up.
- Bend your knees and keep your legs stacked, with your hips and shoulders in a straight line.
- Keep your feet together throughout the movement.
- Slowly raise your top knee while keeping your hips steady. Avoid rolling your body backward.
- Pause for 2–3 seconds at the top of the movement.
- Lower your knee in a slow, controlled manner.
- Perform 15 repetitions, then repeat on the other side. Aim for 2 sets per side.
Helpful Tip: Focus on smooth, controlled movements instead of lifting your knee as high as possible. You should feel the muscles on the outside of your hip working, not your lower back. As your strength improves, you can add a light resistance band above your knees to make the exercise more challenging.[4] If you experience sharp or worsening knee pain, stop the exercise and seek guidance from a healthcare professional.
9. Standing Hamstring Stretch
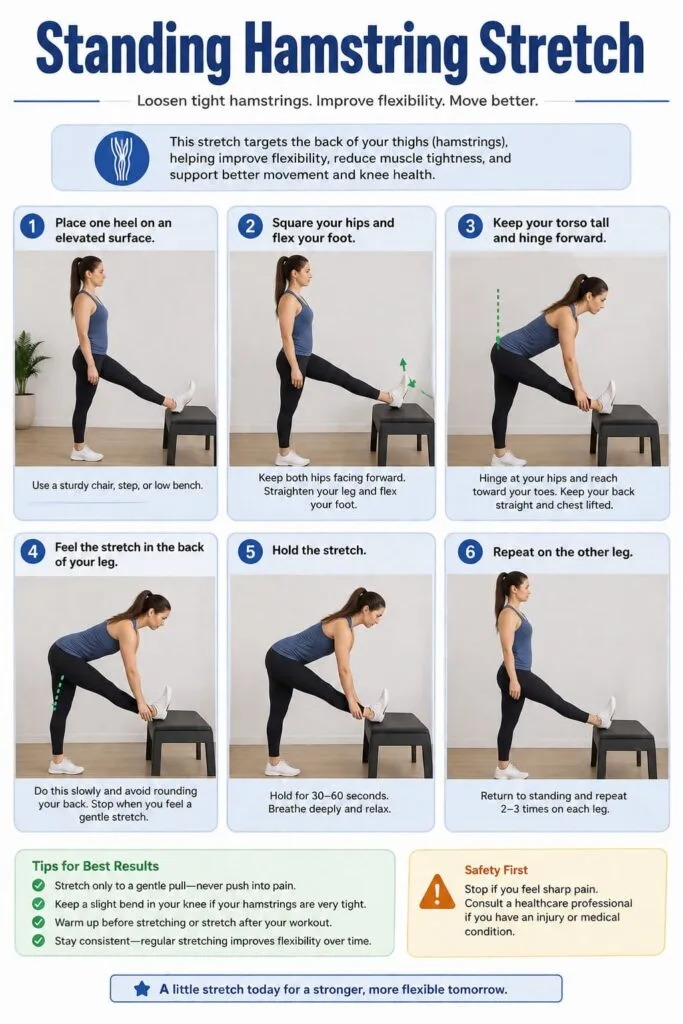
The standing hamstring stretch helps loosen the muscles along the back of your thigh, which flex the knee and extend the hip.[14] Tight hamstrings can reduce knee and hip flexibility, affect your posture, and may contribute to knee discomfort.[9] Stretching them regularly can improve flexibility, increase your range of motion, and make everyday activities like walking, bending, and exercising more comfortable.[8]
How to Do a Standing Hamstring Stretch
- Stand facing a sturdy chair, step, or low bench and place one heel on the elevated surface.
- Keep both hips facing forward and straighten the raised leg as much as is comfortable. Flex your foot so your toes point upward.
- Keep your back straight, chest lifted, and shoulders relaxed.
- Slowly bend forward from your hips until you feel a gentle stretch in the back of your thigh. Avoid rounding your back or bouncing.
- Hold the stretch for 30–60 seconds while breathing slowly and evenly.[8]
- Return to the starting position and repeat 2–3 times on each leg.
Tips for Best Results
- Stretch only until you feel a gentle pull, never sharp pain.
- Keep your knees slightly bent if you have very tight hamstrings.
- Perform this stretch after a short warm-up or at the end of your workout when your muscles are warm.[9]
- Repeat regularly to improve flexibility, support healthy knee movement, and reduce muscle tightness over time.
10. Heel Slides Exercise
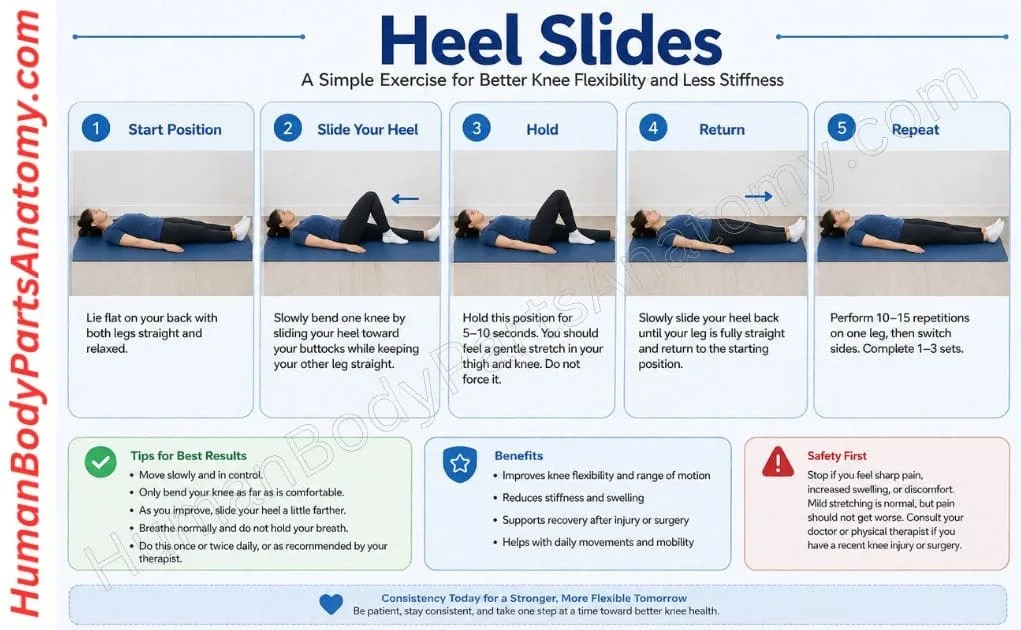
Heel Slides are a simple and effective knee exercise that helps improve knee flexibility, increase range of motion, and reduce stiffness. They are commonly recommended during recovery from knee injuries, surgery, or for people with mild knee pain.[11] Performing this exercise regularly can also help improve everyday movements such as walking, climbing stairs, and getting in and out of a chair.[3]
How to Do Heel Slides
- Start Position: Lie flat on your back on a comfortable surface with both legs straight and relaxed.
- Slide Your Heel: Slowly bend one knee by sliding your heel toward your buttocks while keeping your foot in contact with the floor or bed. Keep the opposite leg straight.
- Hold the Position: Pause for 5–10 seconds when you feel a gentle stretch in your knee and thigh. Do not move into a painful range.
- Return to Start: Slowly slide your heel back until your leg is fully straight.
- Repeat: Perform 10–15 repetitions on one leg, then switch to the other. Complete 1–3 sets, depending on your comfort level or your healthcare provider’s recommendation.
Tips for Better Results
- Move slowly and in a controlled manner throughout the exercise.
- Only bend your knee as far as it feels comfortable. A gentle stretch is normal, but sharp pain is not.
- As your knee becomes more flexible, gradually increase the distance you slide your heel without forcing the movement.
- Breathe normally and avoid holding your breath while exercising.
- Perform Heel Slides once or twice daily, or follow the program recommended by your physical therapist.
11. Foam Rolling
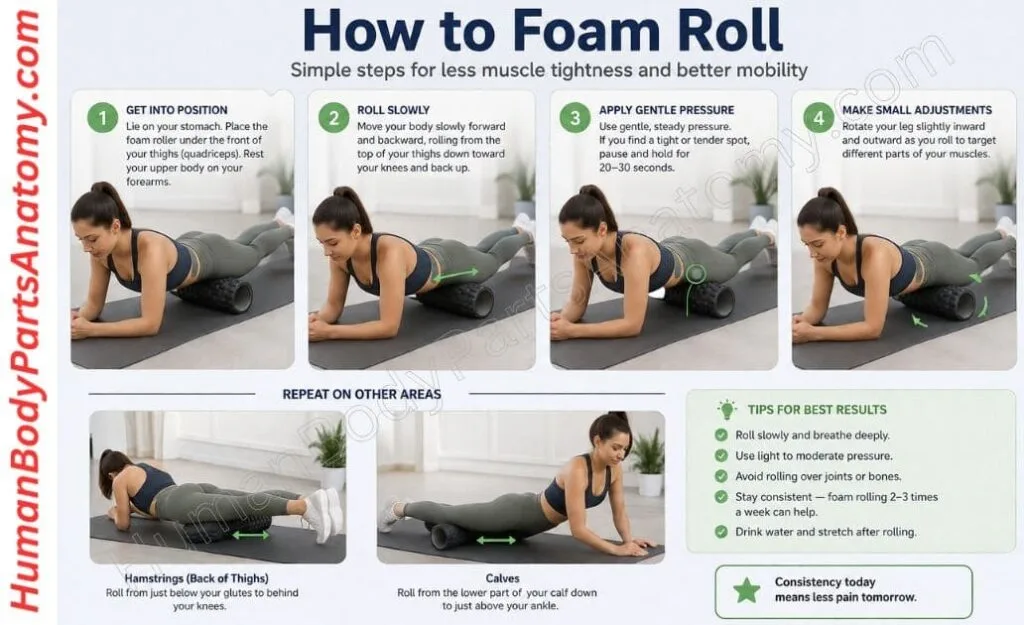
Foam rolling is a simple self-massage technique that can increase range of motion and reduce the feeling of muscle tightness. It is often called “self-myofascial release,” but the evidence does not support the idea that rolling physically releases restrictions in the fascia; researchers consider that term misleading, and attribute the effects instead to how the nervous system responds to pressure, along with changes in blood flow and tissue properties.[15] While it is not a traditional stretch, it can reduce muscle stiffness, increase mobility, and prepare your body for exercise or aid recovery after a workout.[16]
How to Foam Roll
- Lie face down and place a foam roller under the front of your thighs (quadriceps). Support your upper body with your forearms or hands.
- Slowly roll your body forward and backward so the roller moves from the top of your thighs to just above your knees.
- Apply gentle, steady pressure and move at a slow pace. If you find a tight or tender spot, pause for 20–30 seconds or until the discomfort begins to ease.
- Slightly rotate your leg inward or outward to target different areas of the muscle.
- Repeat the same technique on your hamstrings (back of your thighs) and calf muscles for complete lower-body muscle release.
Tips
- Roll slowly instead of moving quickly to get better results.
- Breathe normally and avoid holding your breath while rolling.
- Use light to moderate pressure, especially if you’re new to foam rolling.
- Avoid rolling directly over joints, bones, or areas with sharp pain or an injury.
- Foam roll for 30–60 seconds per muscle group, 2–3 times per week, or after workouts. Lasting gains in range of motion generally require keeping this up for more than four weeks.[16]
12. Hamstring Curls
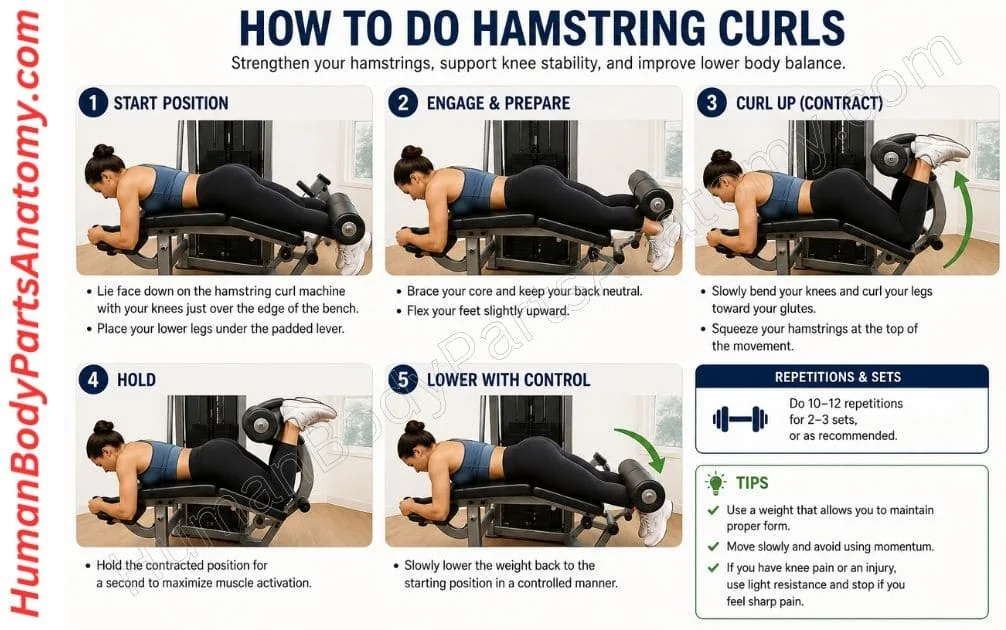
Hamstring curls are a simple yet effective exercise for strengthening the muscles at the back of your thighs. These muscles flex the knee, extend the hip, and act as dynamic stabilisers of the knee joint, which is why they matter for everyday activities like walking, climbing stairs, and standing up from a chair.[14] Strong hamstrings also help balance the strength of your leg muscles; exercise programs for knee pain typically strengthen and stretch both the quadriceps and the hamstrings rather than one alone.[12]
How to Perform Hamstring Curls
- Lie comfortably on a hamstring curl machine with your knees aligned near the edge of the bench. Position your lower legs under the padded bar.
- Keep your stomach muscles engaged and maintain a natural position in your lower back throughout the movement.
- Slowly bend your knees, bringing your heels toward your hips until you feel your hamstrings contract.
- Hold the position for a brief moment, then lower your legs back to the starting position in a slow and controlled manner.
- Complete 10–12 repetitions and repeat for 2–3 sets, depending on your fitness level.
Helpful Tip: Focus on smooth, controlled movements instead of lifting heavy weights. Good technique is more important than the amount of resistance you use. If you’re new to this exercise or have an existing knee injury, begin with light resistance and increase it gradually as your strength improves. Stop the exercise if you experience sharp or worsening knee pain.
13. Leg Extension
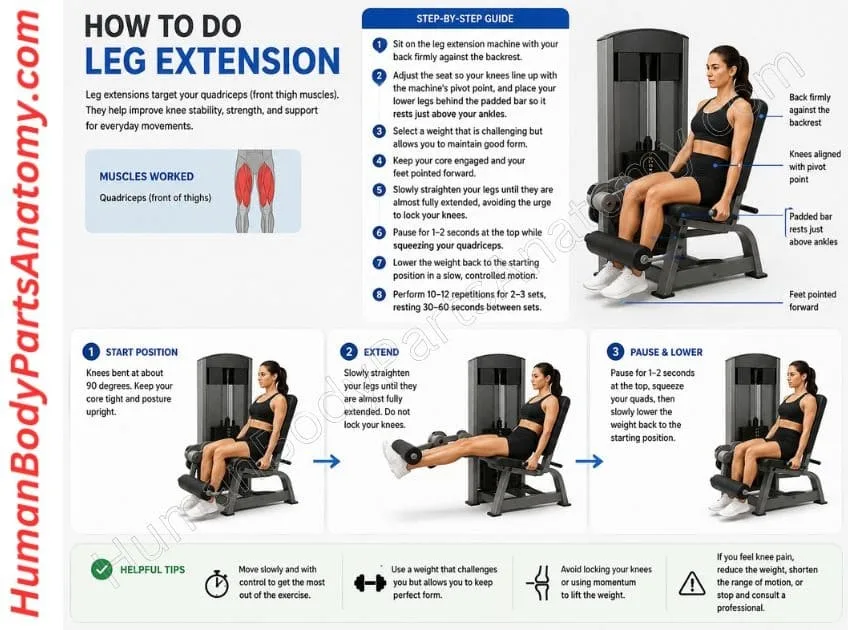
The leg extension is a simple strength exercise that mainly works the quadriceps (front thigh muscles). Strong quads help support the knee joint, improve knee stability, and make everyday movements like walking, climbing stairs, and standing up easier.[6] This exercise is a great addition to a lower-body workout when performed with proper form.
How to Do a leg Extension
- Sit on the leg extension machine with your back firmly against the backrest.
- Adjust the seat so your knees line up with the machine’s pivot point, and place your lower legs behind the padded bar so it rests just above your ankles.
- Select a weight that feels challenging but still allows you to maintain good form.
- Keep your core engaged and your feet pointed forward.
- Slowly straighten your legs until they are almost fully extended, avoiding the urge to lock your knees.
- Pause for 1–2 seconds at the top while squeezing your quadriceps.
- Lower the weight back to the starting position in a slow, controlled motion.
- Perform 10–12 repetitions for 2–3 sets, resting 30–60 seconds between sets.
Helpful Tips
- Move through the exercise slowly to maximize muscle engagement and reduce stress on the knee joint.
- Avoid using momentum or lifting heavier weights than you can control.
- If you experience knee pain during the movement, reduce the weight, shorten the range of motion, or stop the exercise and consult a healthcare professional or physical therapist.[12]
Conclusion –
Regular physiotherapy exercises are one of the safest and most effective ways to reduce knee pain, improve joint function, and support long-term knee health.[3] These simple movements help strengthen the muscles around your knee, improve flexibility, increase stability, and make everyday activities like walking, climbing stairs, and standing easier.[4] The best part is that most of these exercises can be done at home without any special equipment.
Making these exercises part of your daily routine can help reduce stiffness and improve your range of motion. They are suitable for most adults, including beginners, older adults, and people recovering from minor knee injuries.[5] However, if you have severe pain, recent surgery, or a serious knee condition, talk to your doctor or physical therapist before starting a new exercise program. Knee pain has many possible causes — including arthritis, bursitis, tendinitis, torn cartilage, and sprains or strains — and treatment depends on the cause, which is why it is worth getting a diagnosis before self-managing.[1]
To get the best results, begin with gentle exercises such as Quad Sets, Straight Leg Raises, Knee Extensions, Heel Slides, and Standing Calf Raises. Perform each exercise with slow, controlled movements and stop if you experience sharp or worsening pain. As your strength and flexibility improve, you can gradually increase the number of repetitions based on your comfort level.[5]
Key to Pain Relif –
Consistency is the key to lasting knee pain relief. Combined with good posture, a healthy body weight, and regular physical activity, these exercises can help improve mobility and reduce discomfort. Managing your weight lowers the stress on your joints, which is especially helpful for the knees — every extra pound adds about five extra pounds of pressure on the kneecap when you go up and down stairs.[1] Aim for at least 150 minutes a week of moderate-intensity activity plus muscle-strengthening activity on two or more days, broken into shorter sessions if that is easier on your joints.[5] By taking a few minutes each day to care for your knees, you are investing in better joint health and a more active, independent future.
References –
- U.S. National Library of Medicine, MedlinePlus Medical Encyclopedia. Knee pain. National Institutes of Health. https://medlineplus.gov/ency/article/003187.htm
- U.S. National Library of Medicine, MedlinePlus. Knee Injuries and Disorders. Source: NIH National Institute of Arthritis and Musculoskeletal and Skin Diseases. https://medlineplus.gov/kneeinjuriesanddisorders.html
- Lawford BJ, Hall M, Hinman RS, Van der Esch M, Harmer AR, Spiers L, Kimp A, Dell’Isola A, Bennell KL. Exercise for osteoarthritis of the knee. Cochrane Database of Systematic Reviews. 2024 Dec 3;12(12):CD004376. PMID: 39625083. DOI: 10.1002/14651858.CD004376.pub4
- National Institute of Arthritis and Musculoskeletal and Skin Diseases (NIAMS), NIH. Osteoarthritis: Diagnosis, Treatment, and Steps to Take. Reviewed 2025. https://www.niams.nih.gov/health-topics/osteoarthritis/diagnosis-treatment-and-steps-to-take
- Centers for Disease Control and Prevention. About Physical Activity and Arthritis. https://www.cdc.gov/arthritis/prevention/index.html
- Bordoni B, Varacallo MA. Anatomy, Bony Pelvis and Lower Limb: Thigh Quadriceps Muscle. StatPearls / NCBI Bookshelf, National Library of Medicine. Updated 8 May 2023. Bookshelf ID NBK513334. PMID: 30020706. https://www.ncbi.nlm.nih.gov/books/NBK513334/
- StatPearls / NCBI Bookshelf, National Library of Medicine. Anatomy, Bony Pelvis and Lower Limb: Gastrocnemius Muscle. Updated 11 April 2026. Bookshelf ID NBK532946. https://www.ncbi.nlm.nih.gov/books/NBK532946/
- Garber CE, Blissmer B, Deschenes MR, Franklin BA, LaMonte MJ, Lee IM, Nieman DC, Swain DP; American College of Sports Medicine. ACSM position stand: Quantity and quality of exercise for developing and maintaining cardiorespiratory, musculoskeletal, and neuromotor fitness in apparently healthy adults. Medicine & Science in Sports & Exercise. 2011 Jul;43(7):1334–1359. PMID: 21694556. DOI: 10.1249/MSS.0b013e318213fefb
- Harvard Health Publishing, Harvard Medical School. 3 stretches to relieve knee pain. Updated February 2025. https://www.health.harvard.edu/pain/3-stretches-to-relieve-knee-pain
- Willy RW, Hoglund LT, Barton CJ, Bolgla LA, Scalzitti DA, Logerstedt DS, Lynch AD, Snyder-Mackler L, McDonough CM. Patellofemoral Pain: Clinical Practice Guidelines Linked to the International Classification of Functioning, Disability and Health from the Academy of Orthopaedic Physical Therapy of the American Physical Therapy Association. Journal of Orthopaedic & Sports Physical Therapy. 2019 Sep;49(9):CPG1–CPG95. DOI: 10.2519/jospt.2019.0302 https://pubmed.ncbi.nlm.nih.gov/31475628/
- Institute for Quality and Efficiency in Health Care (IQWiG), InformedHealth.org / NCBI Bookshelf, National Library of Medicine. Osteoarthritis of the knee: Learn More — What can you do to strengthen your knees? Updated 2024. Bookshelf ID NBK544978. https://www.ncbi.nlm.nih.gov/books/NBK544978/
- U.S. National Library of Medicine, MedlinePlus Medical Encyclopedia. Anterior knee pain. National Institutes of Health. https://medlineplus.gov/ency/article/000452.htm
- Xie P, István B, Liang M. The Relationship between Patellofemoral Pain Syndrome and Hip Biomechanics: A Systematic Review with Meta-Analysis. Healthcare (Basel). 2022 Dec 28;11(1):99. PMID: 36611559. DOI: 10.3390/healthcare11010099
- StatPearls / NCBI Bookshelf, National Library of Medicine. Anatomy, Bony Pelvis and Lower Limb, Hamstring Muscle. Updated 31 January 2026. Bookshelf ID NBK546688. https://www.ncbi.nlm.nih.gov/books/NBK546688/
- Behm DG, Wilke J. Do Self-Myofascial Release Devices Release Myofascia? Rolling Mechanisms: A Narrative Review. Sports Medicine. 2019 Aug;49(8):1173–1181. PMID: 31256353. DOI: 10.1007/s40279-019-01149-y
- Konrad A, Nakamura M, Tilp M, Donti O, Behm DG. Foam Rolling Training Effects on Range of Motion: A Systematic Review and Meta-Analysis. Sports Medicine. 2022. PMID: 35616852. DOI: 10.1007/s40279-022-01699-8
Read More-
Pain Management –
- Lower Back Pain: An Overview of Types, Risk Factors, and When to Seek Medical Care
- Lower Back Pain in Women: Why It Affects Women Differently — Causes, Symptoms, Treatment & Prevention
- Lower Back Pain Treatments: Effective Relief Options, Tests & Expert Tips
- Lower Back Pain Causes & Symptoms: Common Reasons & Risk Factors
- RICE Method For Injuries – Rest, Ice, Compression & Elevation
Diagnostic Testing –
- PET Scan vs CT Scan: What’s the Difference and Which One Do You Need?
- CT Scan vs. MRI Scan: Key Differences, Uses, and Which One You Need
Medical Disclaimer
All content on HumanBodyPartsAnatomy.com is educational and based on verified, peer-reviewed medical sources. Articles are authored or reviewed by qualified medical or biomedical professionals to ensure accuracy.
This website does not provide medical advice, diagnosis, or treatment. Always consult a licensed healthcare professional for personal medical guidance.
No commercial or promotional interests influence the medical content published on this site.